Oreo Cupcake Recipe 8 Tips for Best Results
Table of Contents
Have you ever bitten into an Oreo cupcake Recipe that looked amazing but tasted bland or had a weird texture? Why do bakery Oreo cupcakes taste so much better than homemade ones? The secret isn’t fancy equipment or hard-to-find ingredients – it’s knowing the right techniques!
Today, I’m sharing my ultimate Oreo cupcake recipe along with 8 game-changing tips that will transform your baking. These aren’t just any cupcakes – they’re moist, perfectly chocolatey treats with real Oreo flavor in every bite. Even better, they’re easy enough for beginners to master!
Overview: What Makes These Oreo Cupcakes Special
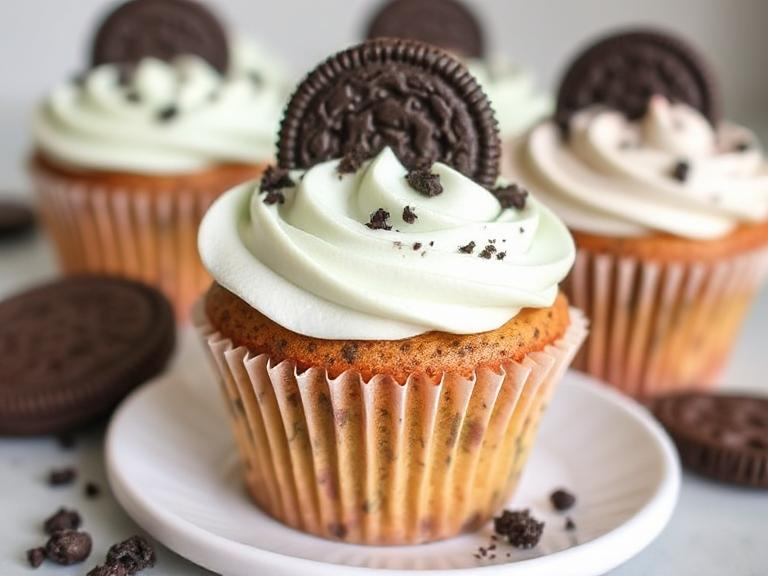
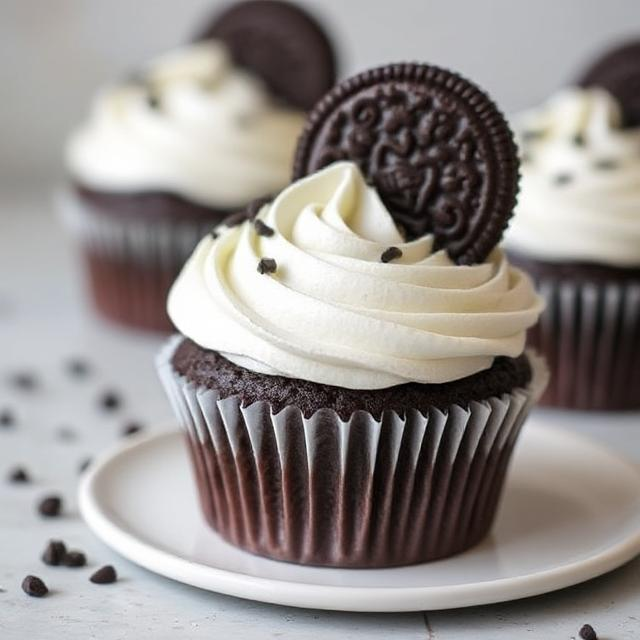
These Oreo cupcakes combine a moist chocolate cake base with real Oreo pieces and a creamy Oreo frosting. The magic happens when the cookies soften slightly in the batter, creating pockets of that classic Oreo flavor we all love.
Time Required:
- Prep Time: 20 minutes
- Cooking Time: 18-20 minutes
- Decorating Time: 15 minutes
- Total Time: About 1 hour
Difficulty Level: Beginner-friendly! If you can follow simple directions and mix ingredients, you can make these cupcakes.
Before we jump into the recipe, let me share the 8 tips that will make your Oreo cupcakes absolutely perfect:
- Crush Oreos properly – not too fine, not too chunky
- Use room temperature ingredients for the smoothest batter
- Don’t overmix the batter once you add flour
- Fill cupcake liners correctly (I’ll show you exactly how much)
- For increased taste, top each cupcake with an Oreo foundation.
- Cool completely before frosting
- Sift powdered sugar for lump-free frosting
- Reserve whole Oreos for the perfect decoration
Now, let’s gather our ingredients and get baking!
Essential Ingredients
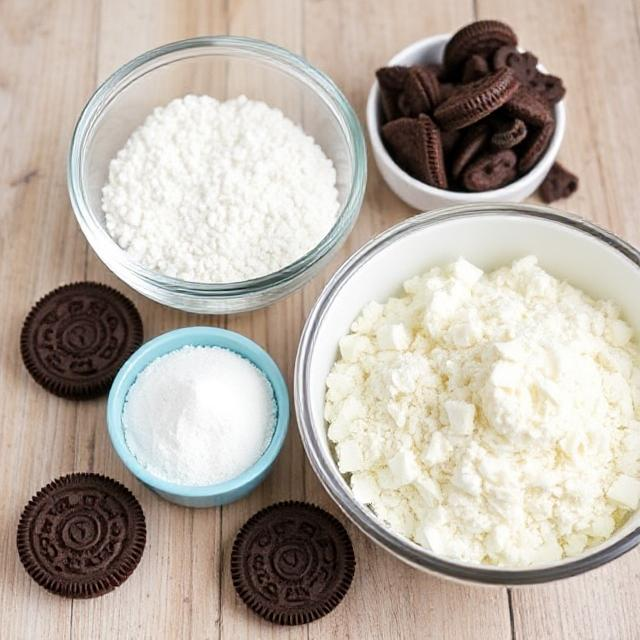
For the Cupcakes:
- 1½ cups all-purpose flour
- 1 cup granulated sugar
- ⅓ cup unsweetened cocoa powder
- 1 teaspoon baking soda
- ½ teaspoon salt
- 1 cup buttermilk (at room temperature)
- ½ cup vegetable oil
- 2 large eggs (at room temperature)
- 2 teaspoons vanilla extract
- 12 Oreo cookies, crushed (plus 12 whole Oreos for the bases)
For the Frosting:
- 1 cup unsalted butter (2 sticks), softened
- 4 cups powdered sugar, sifted
- 2 tablespoons heavy cream
- 1 teaspoon vanilla extract
- Pinch of salt
- 10 Oreo cookies, finely crushed
- 12 whole Oreo cookies for decoration
Why These Ingredients Matter:
Buttermilk: Makes the cupcakes super moist and tender. Don’t have buttermilk? To create your own, mix one cup of milk with one tablespoon of white vinegar or lemon juice, then let it settle for five minutes.
Vegetable Oil: By substituting oil for butter in the cake recipe, these cupcakes maintain their moisture content for several days. Butter might taste great, but it can make cupcakes dry out faster.
Eggs at room temperature: Cold eggs might cause lumps in your batter and don’t combine as well. Taking them out of the fridge 30 minutes before baking makes a big difference!
Crushed Oreos: The star ingredient! They add that distinctive Oreo flavor throughout the cupcake and frosting.
Possible Substitutions:
- Gluten-Free: Make use of gluten-free Oreo cookies and gluten-free all-purpose flour.
- Egg-Free: Replace each egg with ¼ cup unsweetened applesauce.
- Dairy-Free: For the frosting, use dairy-free butter and plant-based milk with 1 tablespoon vinegar in place of buttermilk.
- Oil Options: Canola oil or melted coconut oil work well too.
Step-by-Step Instructions
Preparing the Cupcake Batter
- Heat the oven to 350°F (175°C) and place paper liners into a 12-cup muffin tray.
- Place one whole Oreo at the bottom of each cupcake liner. This creates a cookie base that adds an extra surprise when eating!
- Mix dry ingredients. Combine the flour, baking soda, cocoa powder, and salt in a medium basin and whisk until thoroughly blended.
- Mix wet ingredients. Beat the eggs, vegetable oil, sugar, buttermilk, and vanilla extract in a large bowl until smooth.
- Combine wet and dry ingredients. Mix on low speed until barely incorporated, then gradually add the dry ingredients to the wet components. Stop mixing as soon as the flour disappears! (Tip #3: Overmixing activates the gluten in flour, making cupcakes tough instead of tender.)
- Add crushed Oreos. Using a spatula, gently fold in the smashed Oreo cookies. Leave some chunks for texture – don’t crush them into powder! (Tip #1)
Baking the Cupcakes
- Fill the cupcake liners. Using an ice cream scoop or ¼ cup measure, fill each liner about ⅔ full. This gives room for rising without overflow. (Tip #4)
- Bake for 18-20 minutes. You’ll know they’re done when a toothpick inserted in the center comes out with a few moist crumbs (not wet batter).
- Cool properly. After five minutes of cooling in the pan, move the cupcakes to a wire rack to finish cooling. Don’t rush this step! (Tip #6: Frosting warm cupcakes will make the frosting melt and slide off.)
Making the Oreo Frosting
- Beat the butter. Beat the softened butter in a large bowl for approximately three minutes, or until it is light and fluffy. For optimal results, the butter has to be at room temperature! (Tip #2)
- Add powdered sugar gradually. Add the sifted powdered sugar one cup at a time, beating well after each addition. (Tip #7: Sifting prevents lumps in your frosting!)
- Add cream and vanilla. Until the frosting is creamy and fluffy, add the heavy cream, vanilla extract, and sprinkle of salt. One spoonful at a time, add a bit more cream if it’s too thick.
- Mix in Oreo crumbs.The crumbled Oreo cookies should be uniformly dispersed throughout the frosting after being folded in.
Assembly and Decoration
Now comes the fun part – bringing your Oreo cupcakes to life!
- Make sure cupcakes are completely cool before frosting. I can’t stress this enough! Even slightly warm cupcakes will melt your beautiful frosting.
- Choose your frosting method:
- For a rustic look: Use a knife or offset spatula to spread frosting on each cupcake.
- For a bakery-style finish: Fill a piping bag fitted with a large star tip and pipe swirls on top of each cupcake.
- Add the finishing touch. Press a whole Oreo cookie into the frosting of each cupcake, or sprinkle with additional Oreo crumbs. (Tip #8: Setting aside whole Oreos for decoration makes your cupcakes instantly recognizable!)
- Get creative with variations:
- Drizzle with chocolate sauce
- Add sprinkles
- Use mini Oreos for a cute touch
- Add a dollop of chocolate ganache before the Oreo
Presentation Tips for Special Occasions:
- Birthday Parties: Add colorful sprinkles and candles alongside the Oreo decoration.
- Holidays: Use seasonal colored frosting (orange for Halloween, green for St. Patrick’s Day).
- Bake Sales: Wrap individually in clear cellophane with a cute ribbon.
- Dinner Parties: Serve on a pretty cake stand with fresh berries around the base.
Storage and Make-Ahead Tips
These Oreo cupcakes stay fresh and delicious for several days if stored properly!
Storing Finished Cupcakes:
- Room Temperature: Keep for up to two days in an airtight container.
- Refrigerator: Keep for up to five days in an airtight container. For optimal flavor and texture, let it come to room temperature before serving.
- Freezer: Keep unfrosted cupcakes in the freezer for up to three months. Thaw overnight in the refrigerator before frosting.
Make-Ahead Options:
- Cupcakes: Prepare the cupcakes up to two days in advance, let them cool fully, and then store them at room temperature in an airtight container.
- Frosting: Prepare up to three days in advance and chill. Before using, reheat to room temperature and whip again.
- Assembled Cupcakes: For best results, frost cupcakes the day you plan to serve them.
Freshness Tip:
The Oreo cookies in the frosting and on top will gradually soften over time. If you want that perfect cookie crunch, add the Oreo decorations just a few hours before serving.
Recipe Variations
Love this basic Oreo cupcake recipe? Try these creative twists:
Flavor Variations:
- Golden Oreo Cupcakes: Use vanilla cake mix instead of chocolate and Golden Oreos instead of regular Oreos.
- Mint Oreo Cupcakes: Add ½ teaspoon mint extract to the batter and use Mint Oreos.
- Peanut Butter Oreo Cupcakes: Use Peanut Butter Oreos and add 2 tablespoons of peanut butter to the frosting.
- Red Velvet Oreo Cupcakes: Make a red velvet cake base with Oreos mixed in.
- Double Stuffed Delight: Use Double Stuf Oreos for extra creme filling goodness.
Special Diet Versions:
- Vegan Oreo Cupcakes: Use plant-based milk, flax eggs, and vegan butter.
- Reduced Sugar: Cut sugar to ¾ cup in the cake and use a less sweet frosting.
Miniature Version:
Make mini Oreo cupcakes using a mini muffin tin. Crush the Oreos finer, adjust baking time to 10-12 minutes, and use mini Oreos for decoration.
Health Benefits and Nutrition
While these cupcakes are definitely a treat, there are ways to make them a bit more nutritious:
- Dark Chocolate: The cocoa powder contains antioxidants.
- Reduced Sugar Option: You can cut the sugar by up to 25% without drastically affecting taste.
- Portion Control: Mini cupcakes provide the same flavor satisfaction with fewer calories.
Remember, treats are part of a balanced lifestyle when enjoyed in moderation!
Conclusion
With these 8 expert tips and easy-to-follow instructions, you’re now ready to create Oreo cupcakes Recipe that rival any bakery! The beauty of this recipe is that it’s simple enough for beginners but produces professional-looking results that will impress everyone.
Don’t be afraid to experiment with different Oreo flavors or decorating styles to make these cupcakes your own. The most important ingredient is the joy of baking and sharing these delicious treats with others.
Whether you’re making these for a birthday, school bake sale, or just because it’s Tuesday, these Oreo cupcakes are sure to bring smiles all around. Happy baking!
Frequently Asked Questions
Can I make these cupcakes ahead of time?
Yes! You may prepare the unfrosted cupcakes one to two days in advance and keep them in an airtight container. The frosting may be prepared up to three days in advance and stored in the refrigerator. For best results, assemble and frost the cupcakes the day you plan to serve them.
When the cupcakes are done baking, how can I tell?
Place a toothpick in the cupcake’s center. It should come out with a few moist crumbs, but no wet batter. Overbaking will make them dry!
Can I use a box cake mix instead?
Absolutely! Start with a chocolate box mix and add 1 cup of crushed Oreos to the batter. Still place a whole Oreo at the bottom of each liner for that special touch.
Why did my Oreos get soggy?
The Oreos in the batter will soften as they bake (that’s part of the magic!). To keep the decoration Oreos crunchy, add them just before serving or a few hours ahead at most.
Can I make this recipe without a mixer?
Yes! You may use a whisk to manually stir the cupcake batter. For the frosting, softened butter can be beaten by hand, but it requires more effort to get it fluffy.
How many cupcakes does this recipe make?
This recipe makes 12 standard-sized cupcakes. You can double it for 24 cupcakes.
Is it possible to make a cake using this recipe rather than cupcakes?After adding the flour, do not overmix the mixture.
Yes! This recipe will make one 9-inch round cake. Increase the baking time to 30-35 minutes.
Are Oreos vegan?
Regular Oreos don’t contain animal products in the ingredients, but they’re made in facilities that process milk products. There are certified vegan cookie options available if needed.
How do I transport these cupcakes without ruining the frosting?
Invest in a cupcake carrier with individual wells, or place toothpicks around each cupcake before covering to prevent the plastic wrap from touching the frosting.
Can I reduce the sugar in this recipe?
Yes, you can reduce the sugar in the cupcake batter by up to ¼ cup without significantly affecting the texture. For the frosting, you can reduce the powdered sugar, but it will make the frosting softer.
Share Your Experience With us
There are no reviews yet. Be the first one to write one.